

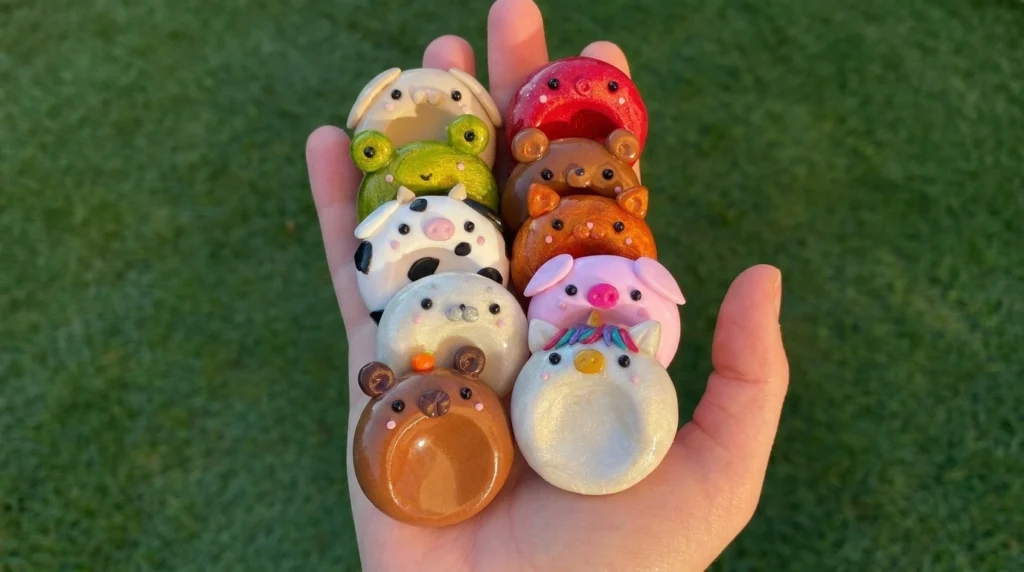
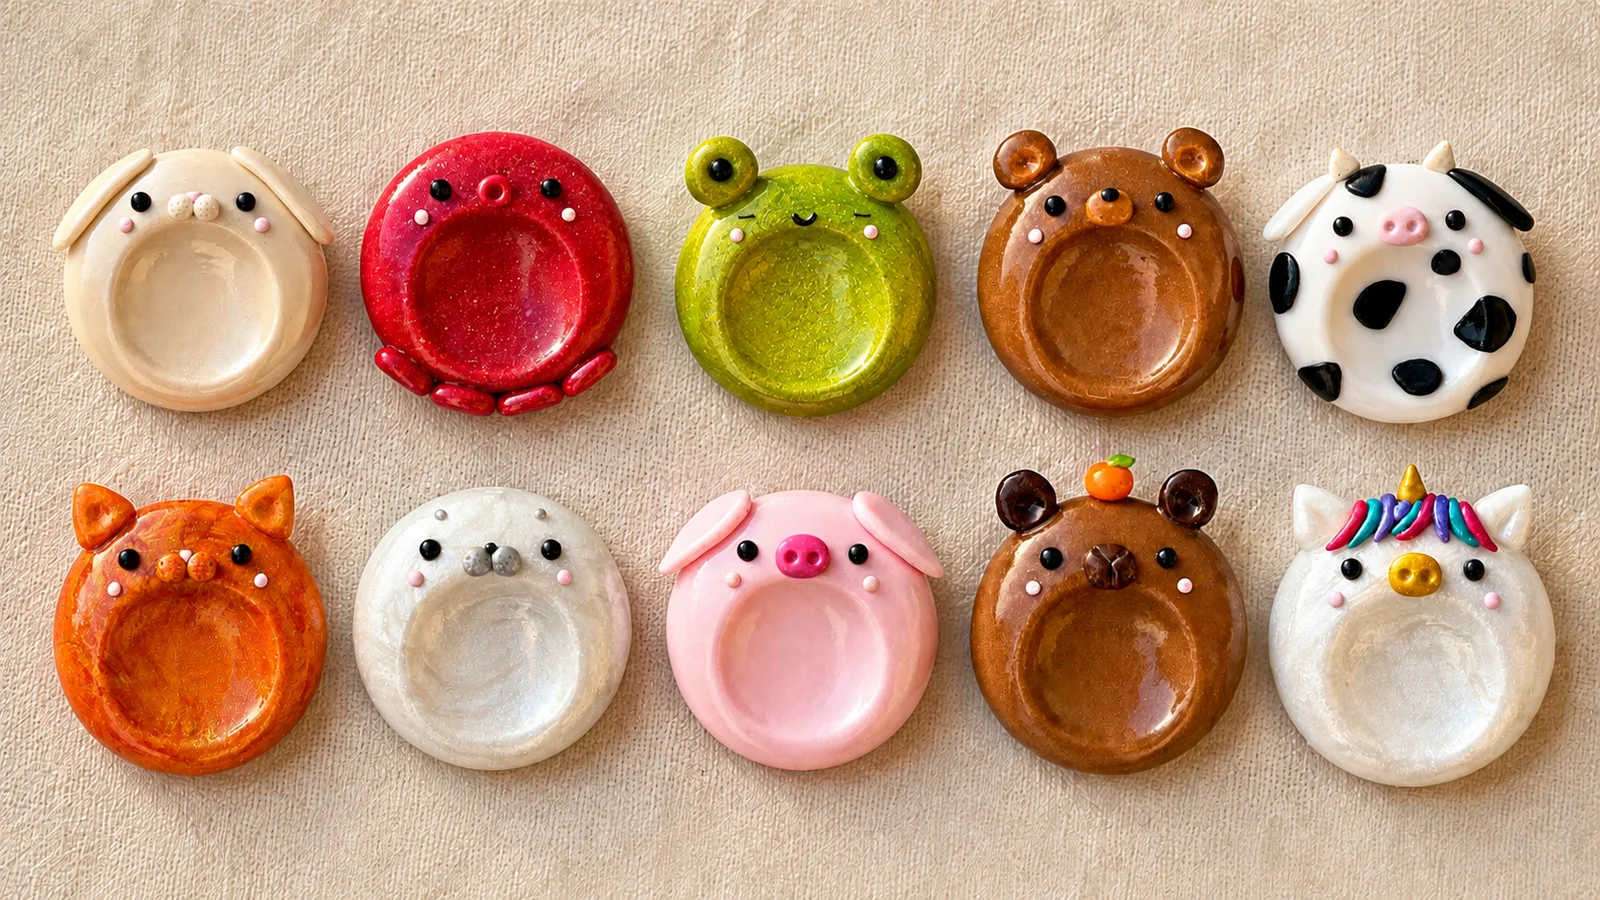
Make a pocket-sized collection of DIY clay worry stones with a smooth thumb hollow and a tiny animal face. This tutorial covers the same ten characters shown in the reference photos: bunny, octopus, frog, bear, cow, cat, seal, pig, capybara, and unicorn.
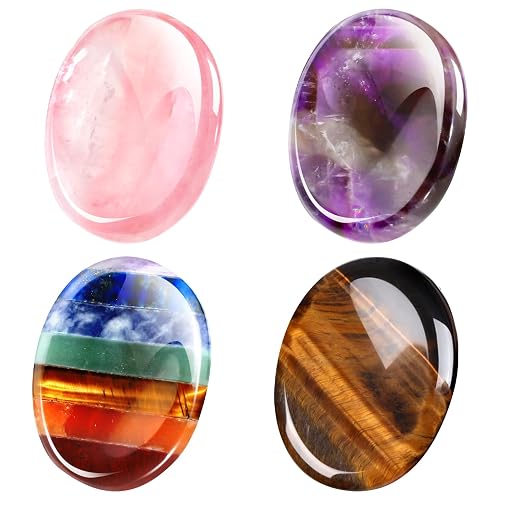
Although their pearly colors resemble gemstones, these are sculpted polymer-clay pieces. The ClayCuties25 Etsy listing identifies polymer clay as a material. You do not need a rock tumbler, gemstone rough, or a kiln.
The instructions below reconstruct the visible designs using a practical hand-sculpting method. The color mixes and measurements are suggested starting points, not the seller’s disclosed recipe or verified dimensions. Small differences in clay, lighting, and hand shaping will affect the result.
Project at a glance: Make ten stones approximately 38–42 mm across. Allow roughly three to five hours of hands-on work for a first collection, plus baking, cooling, and the finish’s drying time. Start with the seal or pig to practice the shared shape.
Gather supplies for DIY clay worry stones
Choose an oven-bake polymer clay whose range includes pearl or metallic colors. Built-in shimmer is easier to control than loose powder, especially around the thumb hollow. Keep the main colors and tiny details within one compatible clay range whenever possible.
- Clay: About 250 g total is a useful starting allowance, including practice pieces and details. Gather pearl white, cream, pink, black, red, green, brown, orange, gold, turquoise, and purple.
- Shaping tools: A smooth tile or clay mat, acrylic roller, ruler, craft blade, blunt needle tool, and a small ball stylus. A clean rounded tool handle can help smooth hollows.
- Joining supplies: A polymer-clay bonding product compatible with your clay, if needed for small attachments. Follow its baking directions.
- Baking equipment: An oven, oven thermometer, baking tray, and a manufacturer-approved baking surface or liner.
- Finishing supplies: Fine wet-and-dry abrasive paper, a soft brush, lint-free cloth, and optional polymer-clay-compatible gloss glaze.
Use dedicated craft tools and protect furniture from uncured clay. Clean hands and tools before moving from black or red to white. Keep little components away from young children and pets; an adult should handle blades and baking.
To approach the reference colors, begin with pearl white for the seal and unicorn, creamy pearl for the bunny and cow, pale pink for the pig, ruby red for the octopus, yellow-green pearl for the frog, copper-brown for the bear and capybara, and orange pearl for the cat. Knead a tiny amount of gold into colored pearl clay to warm its shimmer. Bake a scrap swatch before committing the whole batch.



Shape one comfortable base for all ten animals
The shared body does most of the work: a rounded disc, a shallow oval depression in its lower half, and a thicker upper band for the face. Make this comfortable before adding decorations.
DIY clay worry stones: size the thumb hollow first
- Condition the clay. Knead each body color until it bends smoothly without crumbly edges. Roll a ball, pressing out folds as you work. Reserve a small portion for matching ears or muzzles.
- Flatten the body. Press the ball into a disc approximately 38–42 mm wide and 8–10 mm thick. Round the edges and keep the back flat enough to rest on the tray without rocking.
- Press the hollow. Support the disc on the work surface. Press a clean thumb gently into the lower center, then rock it slightly to lengthen the depression. Aim for an oval about 20–25 mm long, adjusting it to the intended hand.
- Check the underside. Keep at least approximately 4–5 mm of clay beneath the deepest point. If the center becomes thin or translucent, reshape it now. Avoid a sharp ridge where the hollow meets the rim.
- Smooth the contact area. Glide a rounded tool lightly over fingerprints, then try a short thumb stroke. Leave the upper third available for eyes and a muzzle. Decorations should stay outside that rubbing path.
These measurements describe this tutorial’s suggested build. A smaller hand may need a smaller disc and hollow. Make one plain prototype before shaping all ten; it is easier to adjust a single blank than a decorated collection.
For most faces, use two black clay balls about 2 mm across and two smaller pink cheek dots. Seat each detail into a shallow depression and press its base into the body. Broad contact is stronger than balancing a ball on the surface. Keep eyes rounded but low, and blend the backs of ears into the rim.
Make the ten animal designs
Use the same base and face scale throughout. Complete the decorations while the body is unbaked, supporting it on its tile so you do not flatten the hollow. The numbered variations follow the exact character set in the supplied photos.
Cream bunny with floppy ears
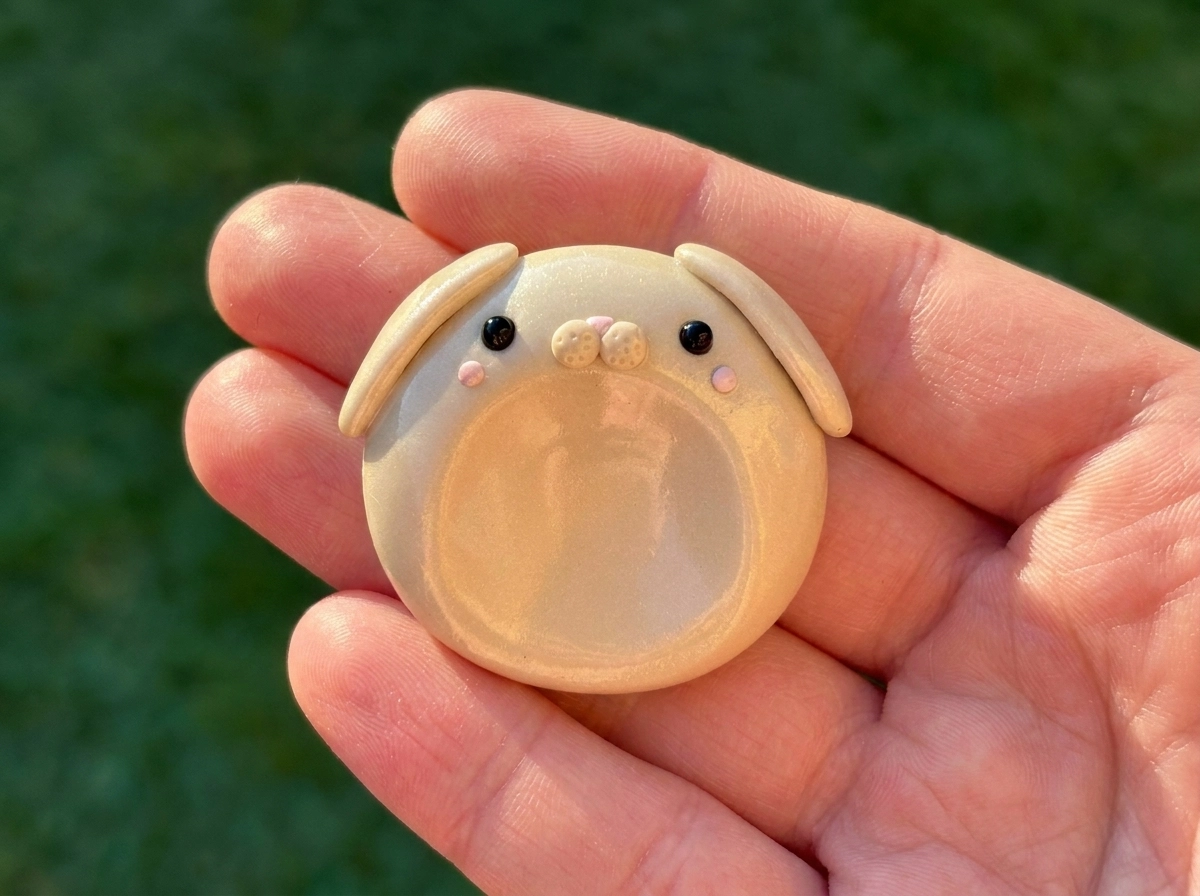
Shape a creamy pearl body. Roll two matching tapered ovals, approximately 15 mm long, and flatten them gently. Lay one along each upper side, with the narrow ends attached near the crown and the rounded tips draping downward.
Add black eyes and pink cheeks. Place two tiny cream discs side by side between the eyes, then add a small pink triangle where their upper edges meet. Lightly stipple the muzzle discs with a blunt point. Blend the ear roots into the back; keep the long tips resting against the body so they cannot easily snag.
Ruby-red octopus
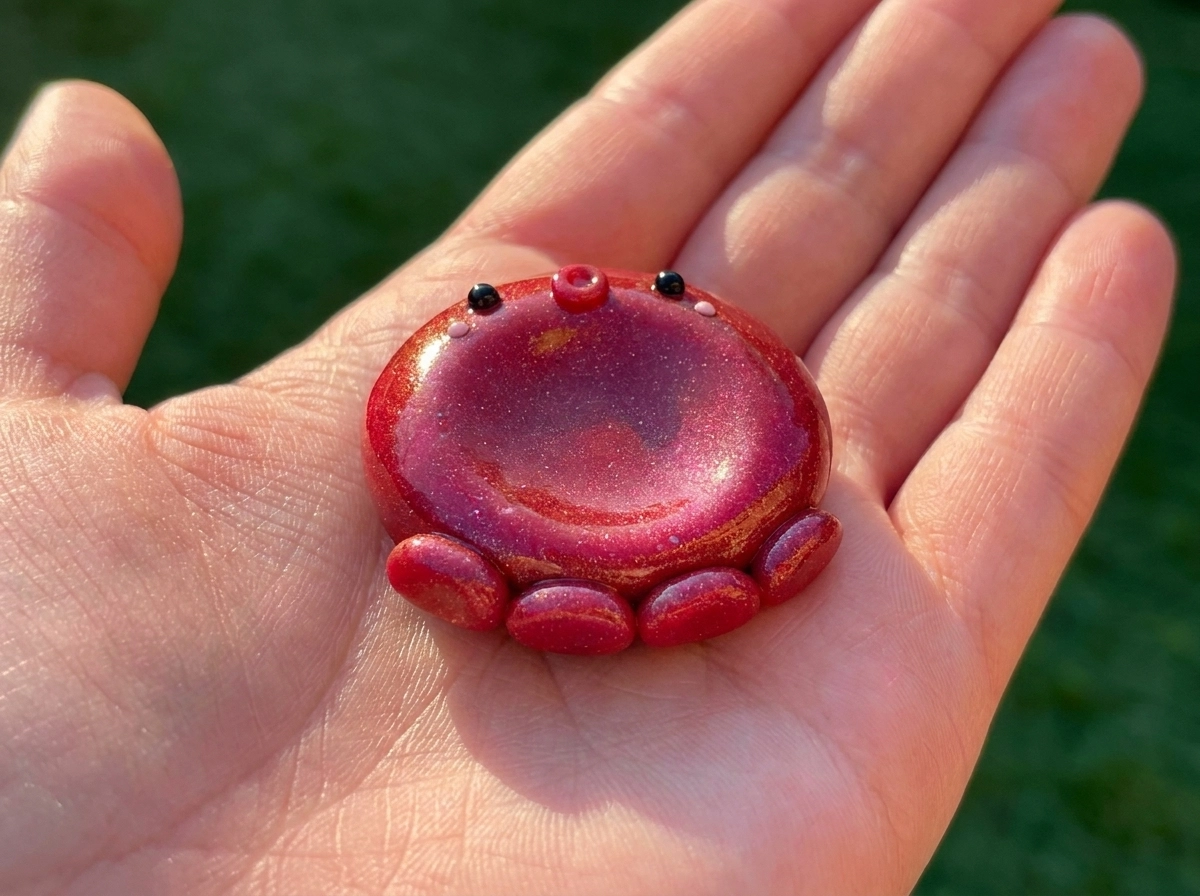
Use red pearl clay, leaving subtle lighter streaks if you want a swirled appearance. Keep the body round and place the black eyes high on the face. Add pink cheek dots and a tiny red ring between the eyes for the open mouth. Make the ring by indenting a small flattened ball without piercing the body.
The reference shows four short, flattened tentacle pads across the visible bottom edge. Form four red capsules and join them there, blending their backs securely into the disc. Keep them shallow; the pictured design is stylized rather than an anatomically detailed octopus.
Shimmery green frog
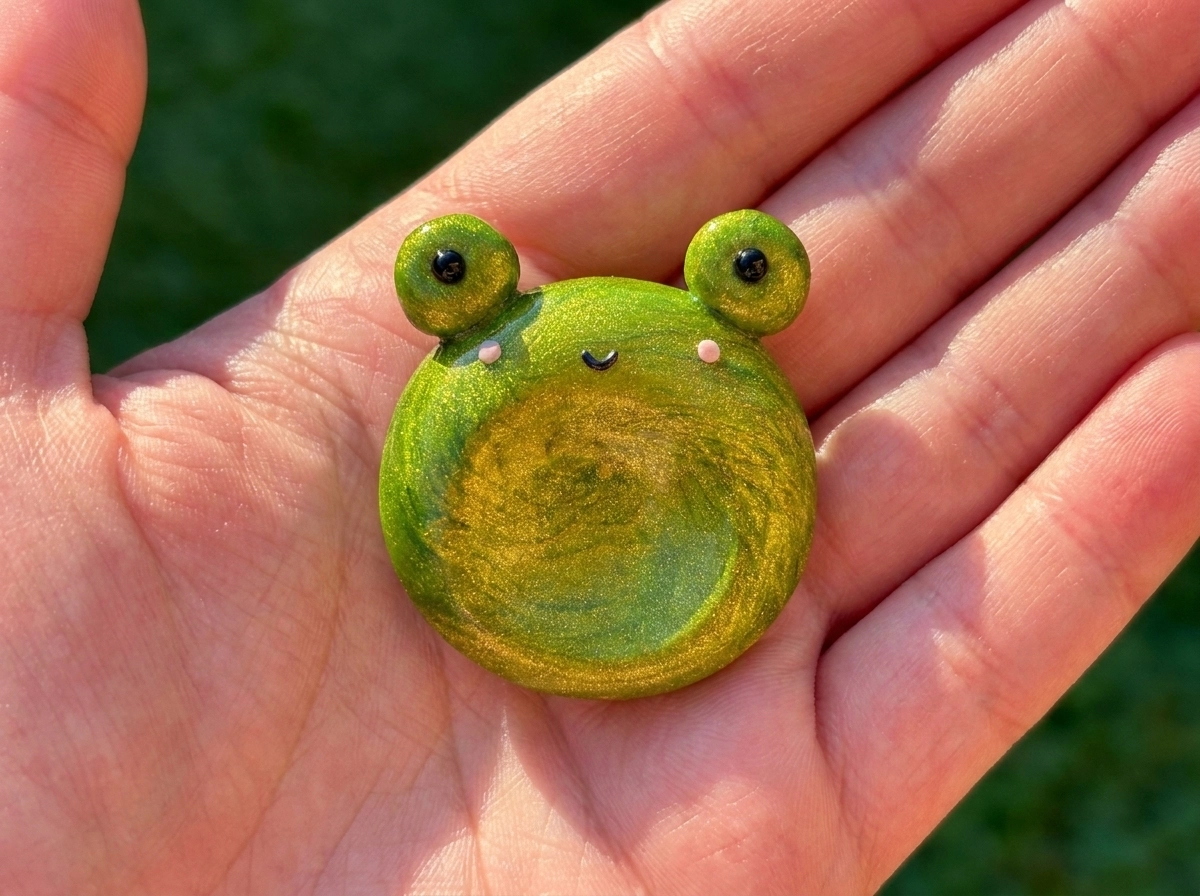
Make a yellow-green pearl body. Flatten two small green balls into eye discs approximately 8 mm wide. Attach them at the upper left and upper right, overlapping the body enough to create strong joins.
Place one black eye on each raised disc. Unlike the other animals, the frog has no second pair of eyes on its main body. Add pink cheek dots beneath the discs and a short curved black clay strand for the smile. Press the strand nearly flush. Keep the eye discs thick at their roots, and blend their backs into the upper rim before baking.
Copper-brown bear
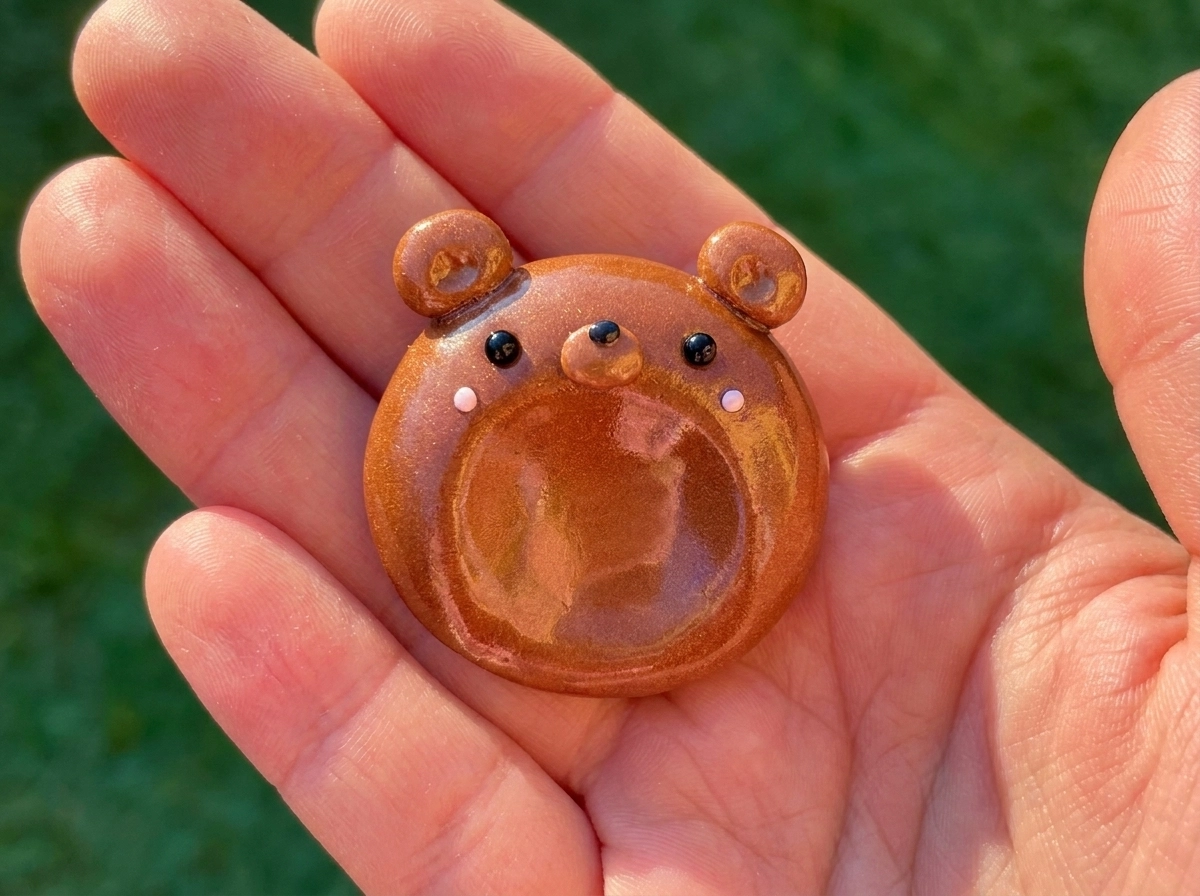
Prepare a warm brown pearl body and two round ears approximately 7 mm across. Press a shallow hollow in each ear with a ball stylus, then attach them symmetrically at the top corners.
Add black eyes, pink cheeks, and a small tan-brown oval muzzle between the eyes. Place a tiny black nose at the muzzle’s upper edge. The bear’s muzzle stays compact and fairly smooth: it does not have the capybara’s broad dark muzzle or fruit decoration. Check that the lower muzzle edge ends above the thumb depression, leaving the rubbing surface uninterrupted.
Black-and-white cow
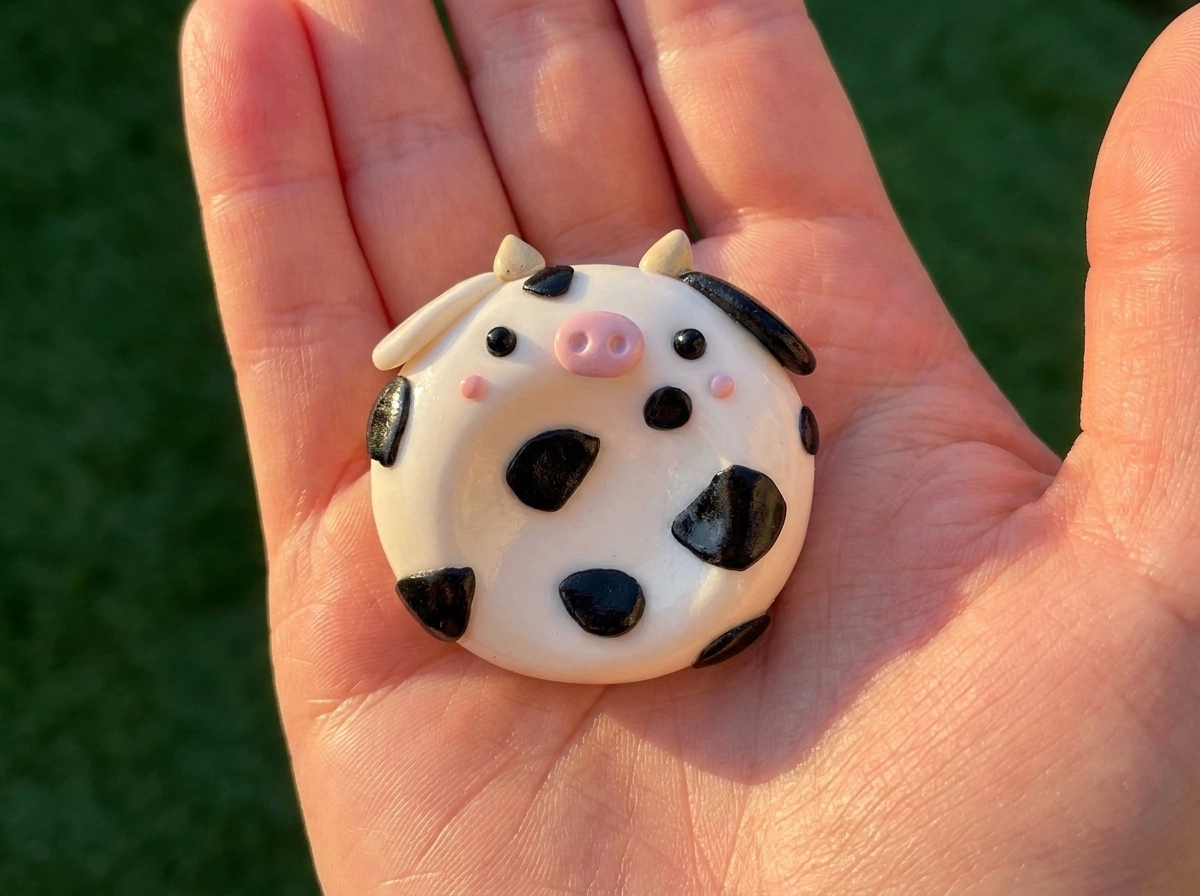
Start with a creamy white base. Before making the final thumb impression, press thin, irregular black patches into the surface and around the sides. Smooth their edges flush so the thumb will not catch. Re-form the hollow gently afterward.
Add two short cream horns and two flattened floppy ears at the upper sides; the reference has a pale left ear and a dark right ear. Place black eyes, pink cheeks, and a pink oval snout between them. Indent two nostrils with a blunt point. Keep the horns short, rounded, and supported at their bases rather than needle-sharp.

Metallic orange cat
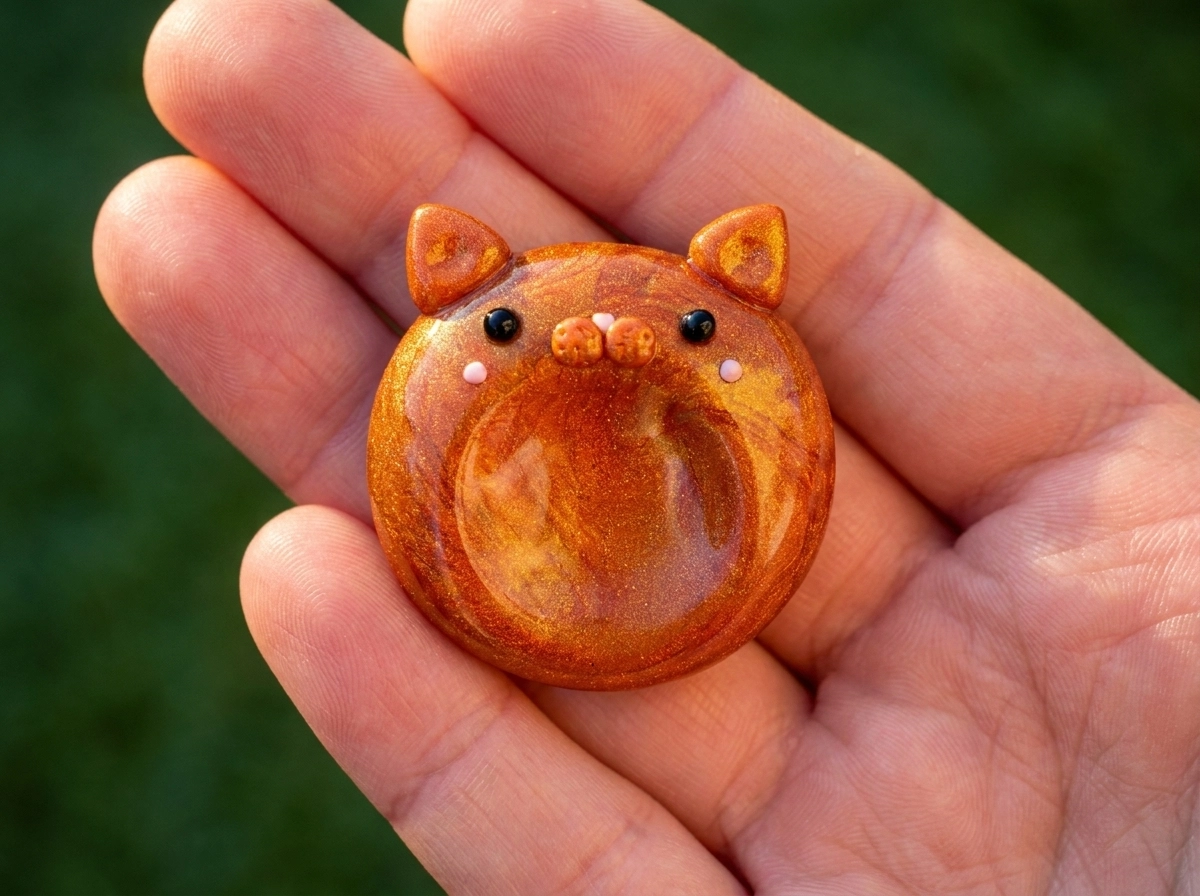
Shape an orange pearl body with a little gold or copper marbling. Make two thick triangles, soften their points, and attach them at the upper corners. Press a small triangular indentation inside each ear while leaving a substantial outer edge.
Add black eyes and pink cheeks. Place two orange muzzle discs side by side and a tiny pink triangular nose above their meeting point. A few shallow dots give the muzzle the texture visible in the reference. Avoid adding projecting whiskers: the photographed cat has a compact face, and long strands would introduce fragile parts.
Pearly silver seal
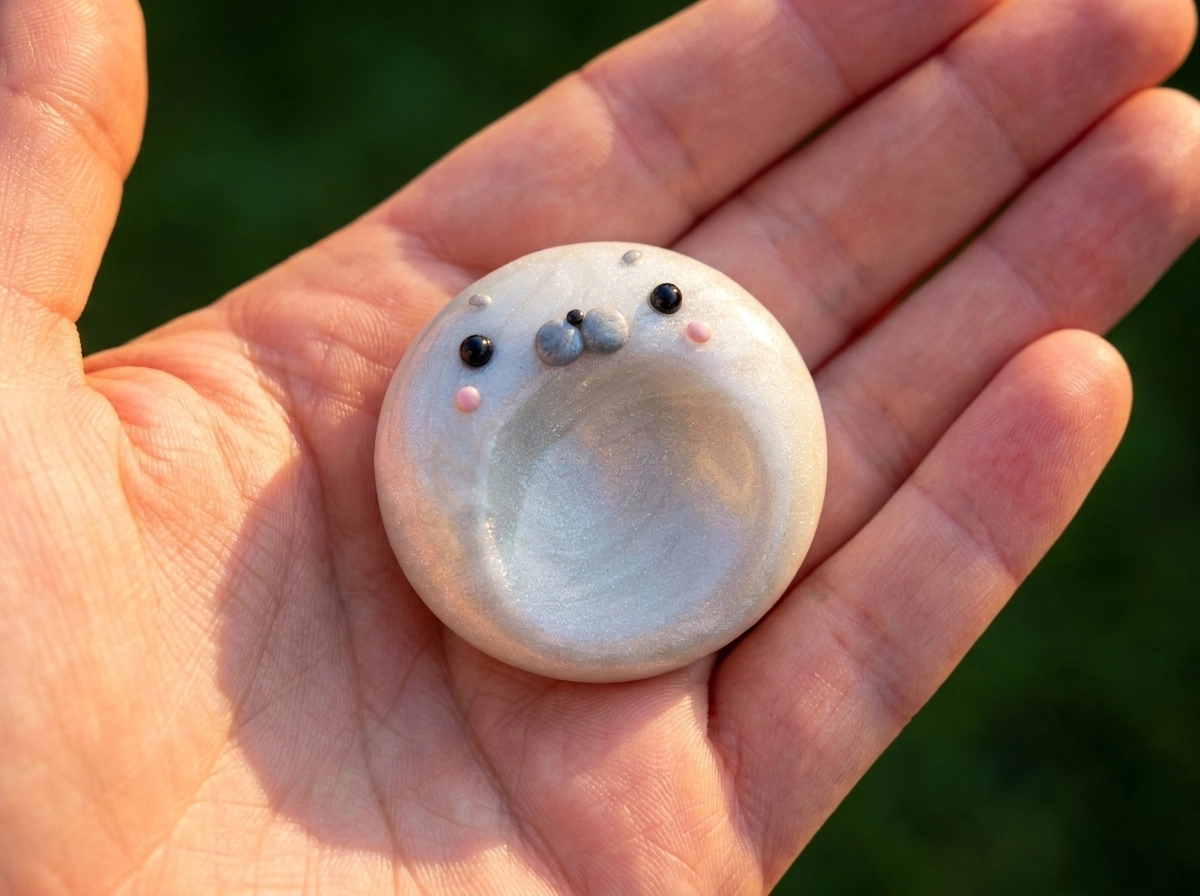
Make a pearl-white body with a touch of gray. Keep its outline softly round, with no prominent ears. Add black eyes, pink cheeks, and two small gray pearl muzzle discs. Fit a tiny dark nose between their upper edges.
The reference includes two minute gray accents above the eyes. Reproduce them as nearly flush dots rather than raised ears. This simple outline makes the seal a useful first attempt. Spend extra time smoothing the hollow and outer edge, because its pale, uncomplicated surface shows fingerprints more clearly than a marbled body.
Pale pink pig
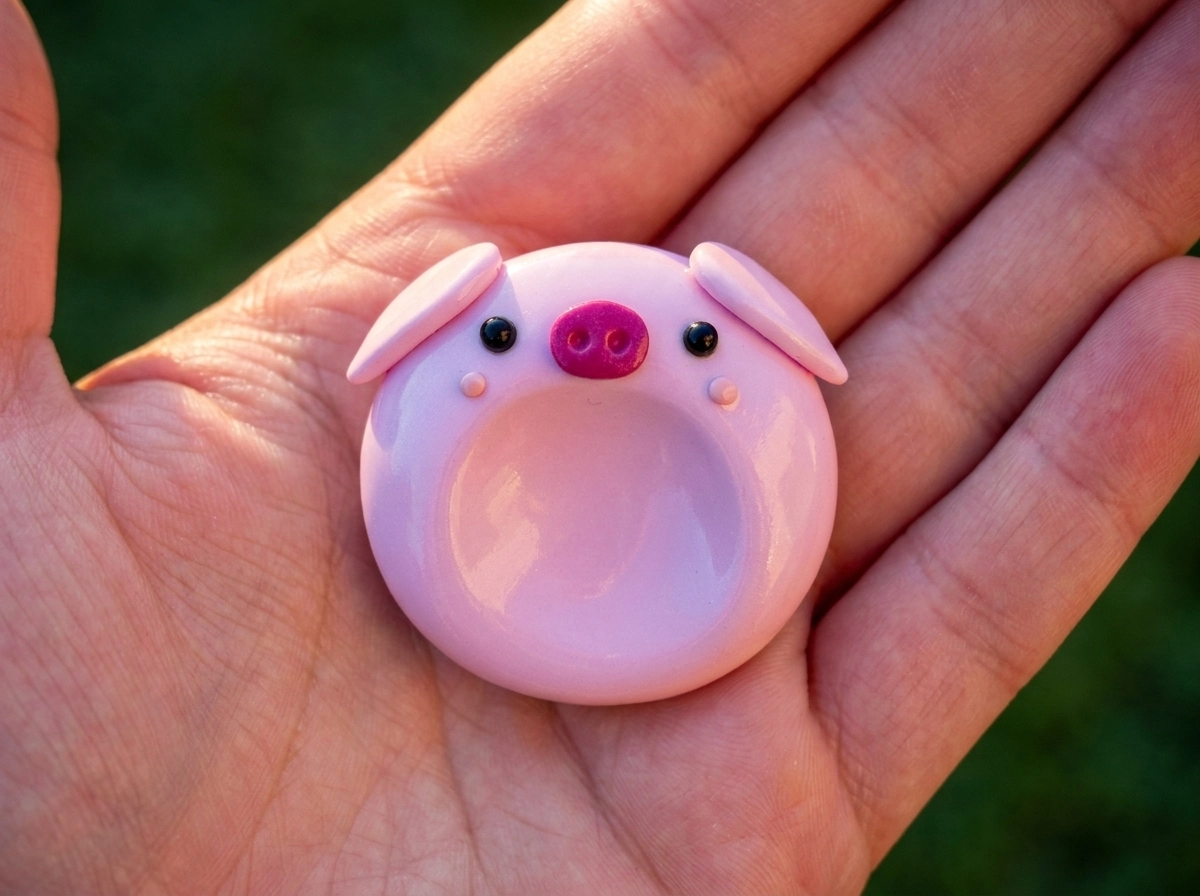
Mix a soft pink body color, saving a stronger pink for the snout. Shape two long flattened oval ears and drape them from the upper sides, resting their tips against the body. The photographed ears extend outward slightly rather than standing upright.
Position black eyes, pale pink cheek dots, and a darker pink oval snout. Press two evenly spaced nostrils into it with a blunt tool. Keep the snout shallow and above the hollow. If the ears slide while you work, let the clay firm briefly at room temperature before gently blending the attachment areas.
Capybara with a tiny orange
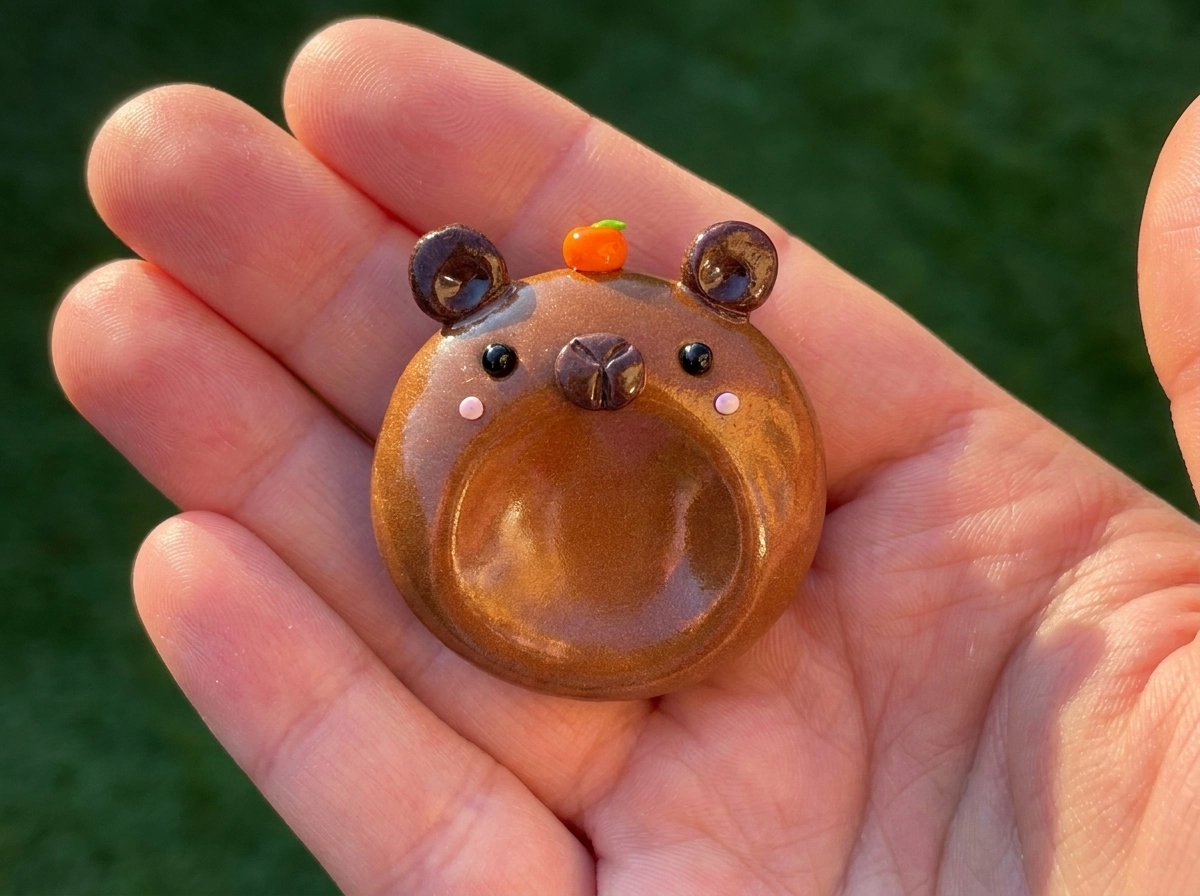
Use a copper-brown body, dark brown cupped round ears, black eyes, and pink cheeks. Add a broader dark brown oval muzzle than the bear’s. Score a shallow Y into it: one short central vertical line meeting two diagonal lines above.
Roll a tiny orange ball, flatten its underside, and place it between the ears. Add a minute green leaf on top. Seat the fruit into the crown rather than balancing it on a narrow stalk. Keep the scoring shallow and the fruit small enough that it does not dominate the face. This fruit is an orange, not a pumpkin.
Pearl unicorn with a colorful mane
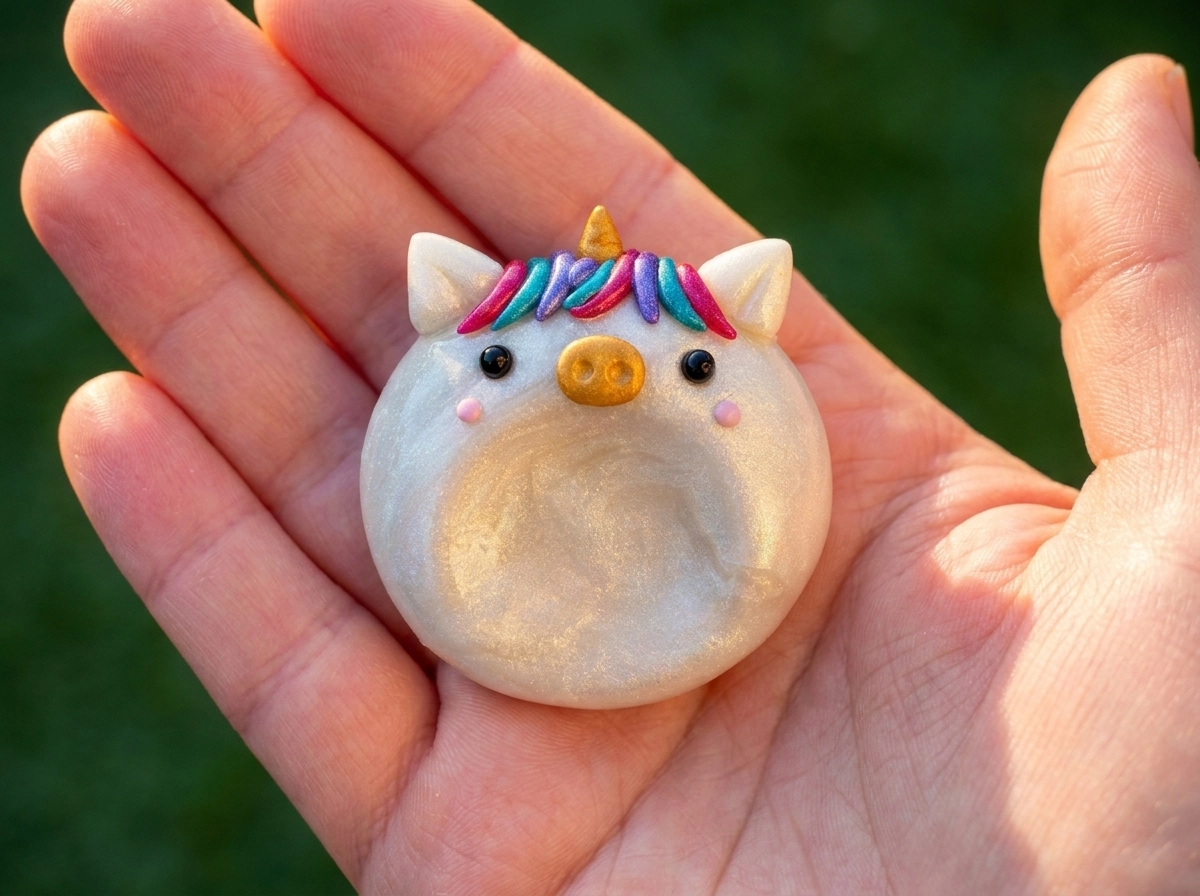
Shape a pearl-white body and two thick pointed ears. Attach a short gold cone between them for the horn, rounding its tip. Add black eyes, pink cheeks, and a gold oval snout with two shallow nostril impressions.
Roll eight small tapered locks: three magenta, three turquoise, and two violet. From the viewer’s left, arrange them magenta, turquoise, violet, turquoise, magenta, violet, turquoise, magenta, with their roots overlapping below the horn. Keep the locks’ ends pressed against the body. Check the horn and ear joins from behind, and smooth points that might catch a pocket lining.
Bake, finish, and troubleshoot your collection
Place the decorated stones face upward on the recommended baking surface. Support overhanging details with an oven-safe support suitable for your clay. Measure the thickest clay section, including stacked decorations; the thin center of the thumb hollow does not determine the whole piece’s baking schedule.
Follow your exact clay package’s temperature and thickness-based time. For example, Sculpey’s Premo project instructions specify 275°F/130°C for 30 minutes per ¼ inch/6 mm. That example is not a universal polymer-clay setting. Verify the oven temperature with a separate thermometer, and never microwave the pieces. Let them cool fully before handling or assessing their firmness.
After cooling, check the thumb path with a fingertip. If needed, gently wet-sand only rough edges with fine abrasive paper, keeping the dust wet and protecting raised details. Rinse away residue and dry completely. Avoid sanding through surface color or flattening the small faces.
For a glossy look, use a finish explicitly compatible with polymer clay and test it on your baked swatch first. Sculpey Gloss Glaze’s directions call for thin coats, 30 minutes between coats, and 24 hours of air drying. Follow the label of whichever product you use. Brush out puddles in the hollow, around eyes, and between mane strands before they dry.
| Problem | Likely cause and practical fix |
|---|---|
| Cracks during shaping | Condition the clay further and smooth folds before flattening. Rebuild an overly thin center before baking. |
| An ear or horn breaks | Give the replacement a wider attachment area. Use a compatible repair product and its stated curing method. |
| Rough thumb hollow | Smooth it before baking; after curing, gently wet-sand accessible roughness and clean away residue. |
| Sticky or cloudy finish | Stop adding coats. Check compatibility and drying conditions on a scrap; follow the finish maker’s removal advice. |
Can you use air-dry clay instead? It changes the drying, joining, durability, and finishing requirements. For this particular glossy collection, follow the polymer-clay method rather than substituting midway through the instructions.
Should these go in a rock tumbler? No. Tumbling would abrade the faces and projecting details. If you want to work with actual stones, use our rock tumbling for beginners guide as a separate project. Already have polished stones? Explore our practical tumbled-rock craft ideas for ways to use them.


Once everything has dried fully, hold each piece in your palm and move your thumb over its hollow. Check for snagging, loose details, or tackiness before pocketing it. Wipe finished pieces with a soft, slightly damp cloth and store them away from keys. They are small tactile craft objects; choose the animal whose shape feels most comfortable in your hand.
 Love Rock Tumbling?
Have a question? Use the form above to submit your question or comment.
I love hearing from you and seeing what you made!